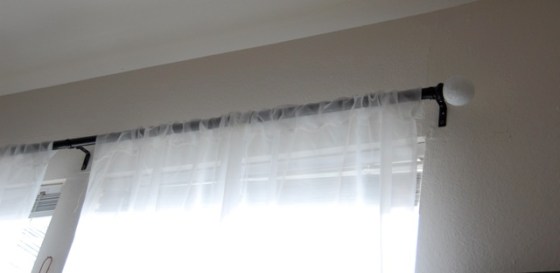
So, we recently moved to Delaware, into what we are lovingly calling “the smallest apartment in the world”. We wanted to put something sheer over our windows, not to block out the beautiful natural light, but to block the view into our humble abode that is available to so many of our neighbors (not that I think they’re so interested; it’s just one of those privacy things). Since we won’t be staying that long, hopefully six months at the most, I didn’t want to spend too much on something that might not work in our next place. When I found instructions documenting how someone had made their own curtain rods, I had to give it a try.
My significant other humored me with a trip to Home Depot, and I was thrilled as can be to get EMT conduit pipe and brackets on Valentine’s Day! I also got beautiful flowers, a nice dinner, and an orchid if anyone was worrying about the sanctity of the holiday. The pipe and the orchid are fighting it out for favorite, though. Thank you Kevin 🙂 (I do realize the previous information reveals how long it took me to document and post this. Getting the blog together took much, much longer than making the rods!)
I decided to blend the rod instructions with different finials, a variation of something I saw on Better Homes and Garden. I already had white paint and Golden’s glass bead paint at home, which gives a really cool effect; so, I decided to try that on the wooden doll heads I bought to use as finials. But you could get really creative with it. Some other potentially cool ideas: decoupage with a cool antique or homemade paper, or an elegant fabric, cabinet pulls, glue on natural objects like small stones or seashells (which I also did, see photos), cover with beads, just paint them black or another solid color. Use something you have laying around your house. Pick a style that reflects you. Have fun. All the pieces of the curtain rods are basic items that can be found in the hardware store or a craft store, and were fairly simple to put together.
My technique is not perfect. The finials were sometimes a bit wobbly (see #10 below) but I am pretty pleased with the results regardless. I had enough extra EMT to make a second rod for a smaller window, and then I made another to cover the ugly sliding blinds on our sliding glass door. Maybe I will take them to my new place after all- it shouldn’t be too hard to cut them to size.
Since I already had a lot of the necessities somehow accessible in our tiny place, additional materials only cost about $30 for 3 curtain rods. So, if you’ve got some of this stuff on hand, give it a try. Sure you can buy inexpensive curtain rods, but they always have those two pieces, the one bigger than the other, that slide apart without tape. And they’re made of plastic/resin. How long will they really last anyway? These curtains have one solid bar, bound to pass the test of time.
If you’re feeling motivated, below are my instructions as I adapted them from the other websites. These directions aren’t perfect. I’m not an expert and I’m sure they reflect my kooky way of doing things. If you find ways to improve the process, I would love to hear your secrets. These instructions assume you are making the white glass bead finials.
UPDATE: Instructions below show the finial being attached to the metal rod with a piece of wooden dowel. This was a little tricky (see #11) . I recently found a wine cork that fits snugly into the end of my metal rod. I think this might make a good replacement and would fix the fit problem. In the future I may try it. I imagine the cork replacing the dowel in steps #4 & 10. You would skip 3 & 11. Of course I’m not sure exactly how this would work- maybe some enterprising person might give it a try & let me know…)
How to Make Your Own Curtain Rod
Pieces:
2 doll heads for finials -wooden balls with part of a side flat. The heads already have holes in them, so try to find ones with smaller holes b/c you will need to put a screw in there. Bring your screw with you to the store to make sure it is bigger than the hole.
(You can buy at Michaels) $3.98 ($1.99 each)
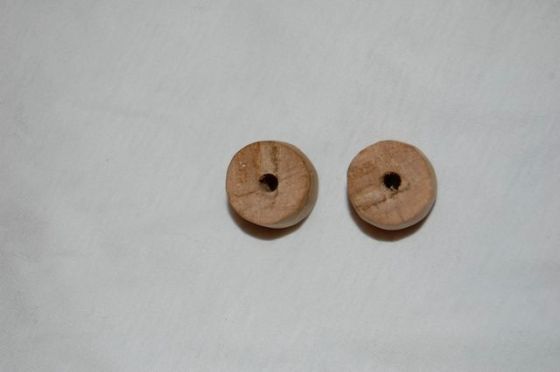
2 wooden wheels for toy cars
(I also found these at Michaels in the same section) $2.38 for a bag of 12 wheels
1, 3/4″ 10ft emt conduit. For a smaller window get 5 ft size
(pipe found in the electrical section at your hardware store) $3.88 made enough for two windows, a big and a small
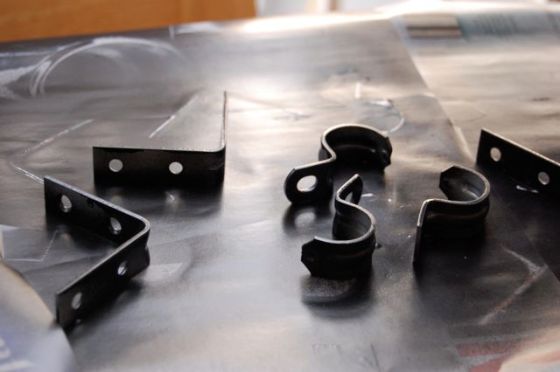
3 conduit straps– buy the right size for your pipe. (3/4″) A smaller window only needs 2.
(found near emt conduit in hardware store) These cost like $1.00 for 4 of them.
3, 2″ L shaped brackets (also called corner braces). For a smaller window use 2.
(found in the brackets section at hardware store) $2.47 for a pack of 4.
3 sets of #24 bolts and #10-24 nylon lock nuts– to attach conduit straps to brackets. You can use regular nuts and screws instead of bolts (which is cheaper) but the screws will leave a pointy tip you may want to hide somehow (see #12 below). A smaller window only needs 2 sets.
(In hardware store or you may already have) Not sure of cost- I had these!
2, 2.5″ long screws to attach finials to rod
(In hardware store or you may already have) $1 something for 2
2, 1″ pieces cut off a 3/4″ wooden dowel – compare the dowel and the emt conduit in the hardware store and make sure you can almost plug the dowel into the end of the conduit pipe
(in hardware store or use your own leftovers- you really only need a few inches here) approximately $3.65
Equipment:
Sanding paper or sanding block (which also works great for cat fur on furniture by the way- just don’t press to hard or you’ll rip up the fabric and this theory has not been tested over long periods of time)
Saw to cut pipe & dowel (or pipe cutter for pipe)
Tape Measure
Can of flat or satin black spray paint designed to adhere to metal and wood (I had satin already at my house)
Clear paint sealer
White paint (can use spray or I used acrylic because I had it at my house)
Golden glass bead paint (I also had this around my house)
Paintbrush & water if using acrylic paint.
Utility Knife
Steps:
1: Measure your windows to cut your pipe. You will probably want it the rod to go out at least three to five inches beyond the window on each side, so include that in the measurement.
2: Cut your metal pipe to desired length. It went fast and easily with the pipe cutter.
3: Cut two 1″ pieces from the wooden dowel.
4. Drill a hole into the end of the wooden dowel- the right size for your screw.
5: Sand all your little metal pieces (conduit straps, L brackets, and tops of smaller screws) to scruff up the gloss. Sand your wooden doll heads, and wheels. They may actually come ready to paint; I wasn’t sure so I sanded just to be on the safe side. Wash everything off with a damp cloth and make sure it dries thoroughly.
6: Paint the doll heads white. It took 3 coats of acrylic paint. Allow it to dry thoroughly in between coats.
7. When the final layer of white paint has dried, paint the glass beads on the finials. This took 1 coat and a touch up coat. I kinda thought it might have looked pretty without the touch up though. Oh well, next time.
8. Following the directions on the black spray paint, paint the emt conduit, the conduit clamps, the L brackets, the nuts and bolts, the wooden wheels. Allow adequate time to dry before handling. Sidebar confession: Although I try to keep most chemicals out of my house (even my cleaning products, makeup, and food) there is one area where I have a rather guilty weakness, and it’s one of the worst chemical offenders. That would be paint. I’m a total sucker for it but, as my significant other reminds me, it’s pretty nasty stuff, especially spray paint. Always spray outside for ventilation. Sunshine helps to immediately breakdown all those toxic compounds. And please don’t breathe it in, and keep away from children! I will be looking for natural stuff in the future, I’m sure, and if anyone knows of any, please inform me of that miracle. Also: I ended up painting over the black wheels with black acrylic paint. Just liked the look better.
9. Spray above pieces with clear coat of sealer to keep the black from rubbing off on curtains. Follow safety tips from above. Allow adequate time to dry.
10. Line up two sets of the dowel, wooden wheel, and finial ball. Screw each set together. You have made a finial set.
11. Using the utility knife trim the outside of the two 1″ wooden dowel pieces so that they fit snugly inside the emt conduit, but can still be pulled out with a good tug. (You will need to in order to get the curtains off.) This whole part was a little tricky. Shave off too much wood and it will be too loose. I accidentally did this a few times, and some of the finials are a little looser than I prefer. [Another update: Although the curtain rods do work that way, because basically they are up and don’t move, I would prefer a tighter fit. Recently I put a little piece of gum eraser (the kind artists use) inside the pipe & that seems to have helped it seal- but I do not yet know if the eraser will dry out over time. ] Maybe there is a similar product, or something like a thin strip of weather stripping foam, or cushiony fabric, that might help. I have yet to put that much energy into figuring it out b/c like I said, the curtain rods are up and they basically don’t move. But if you have kids or adults who like to pull on curtains or are generally tough on curtain rods, maybe you might want a better fit. (For a possible replacement with cork- see the update above the instructions.)
12. Attach the conduit straps to the L brackets with your nut and bolt. (If you used screws you will have a pointy tip. One clever recommendation I read was to push small wooden craft beads onto the screws, twisting to screw them on and cover the screws.)
14. Drill holes it into the wall where you want the L brackets/conduits straps to go, and then screw them into the wall. Two inches out from the window is supposed to be standard.
15. Put a finial set into one end of the EMT conduit.
16. Slide your curtains on. If, at this point, someone is jealous with the amount of time you have been spending on this project they may try to help out. I find a good belly rub usually solves any dilemmas this may cause.
17. Put the other finial set on the other end of the pipe. If in the future you need to take off curtains, you can pull off one of the finials.
18. Clamp your pipe into place on the wall. Make sure you have aligned it first, because if you have to move it the clamps clamp down hard and it might scratch the paint!
19. Arrange curtains as desired.
In the future, I might try experimenting with acrylic paint on the metal, or a long wooden dowel (which the acrylic would stick to better) if I can find it, or maybe a piece of bamboo, so that I can cut down on the toxicity of the paint. While this was fun, I prefer to be environmentally friendly.
Well, there you go! Simple, creative, and cheap. Thanks to those who gave me the ideas. I got myself so inspired, I used seashells I’d collected in Florida to make another one. Did you come up with something unique? Post pictures here; would love to see them!

Related Posts


What a great step-by-step to building your own curtain rods. You definitely make it seem so easy. Great work and thank you so much for suggesting Rust-Oleum to complete the project.
Thanks Scott- the paint sure transformed those pipes!
Awesome instructions! I found amazing mercury glass ornaments on http://www.lunabazaar.com for less than $4 that I’m gonna try as my finials… I’ll post pics soon
Those ornaments are beautiful! Great idea. Would love to see pictures; I’m looking forward to seeing how they turn out!